Mastering Lip Filler Injection Techniques: A Comprehensive Guide
12 April 2024

In this post:
- Learn why we consider linear threading the best lip filler technique for beginner injectors and other popular methods for achieving stunning results.
- Discover why injection depth is crucial for minimising complications and ensuring natural-looking outcomes for your patients.
- Get a full understanding of the safety considerations you must take to avoid complications and other undesirable outcomes during treatment.
- Gain insight into the tools used during lip filler treatment to enhance precision and effectiveness.
As a beginner injector, lip filler is likely one of the first treatments you’ll learn. Your patients are desperate for fuller, more youthful lips, and this treatment is the best way to achieve that. However, as we’ve learned from our years of experience at Smileworks Liverpool, your success with lip filler is completely dependent on the injecting techniques you use.
Read on for the essential techniques, tips, and considerations for achieving the perfect pout with lip filler.
Before You Inject
There are certain steps you must take during every lip filler appointment. Many of them happen before you start injecting.
You should have already done the following:
- Consulted with your patient
- Chosen the right type of filler
- Prepped your patient
- Prepped the treatment area
- Delivered local anaesthetic
If you’ve ticked off all of those steps, you’re ready to inject! We outline all of the above in depth in our online lip filler course. These steps are crucial for setting up an effective treatment and ensuring a happy patient.
Understanding Lip Injection Depth
When you’re first starting out in aesthetics, it can sometimes be difficult to understand all of the terminology while also injecting effectively.
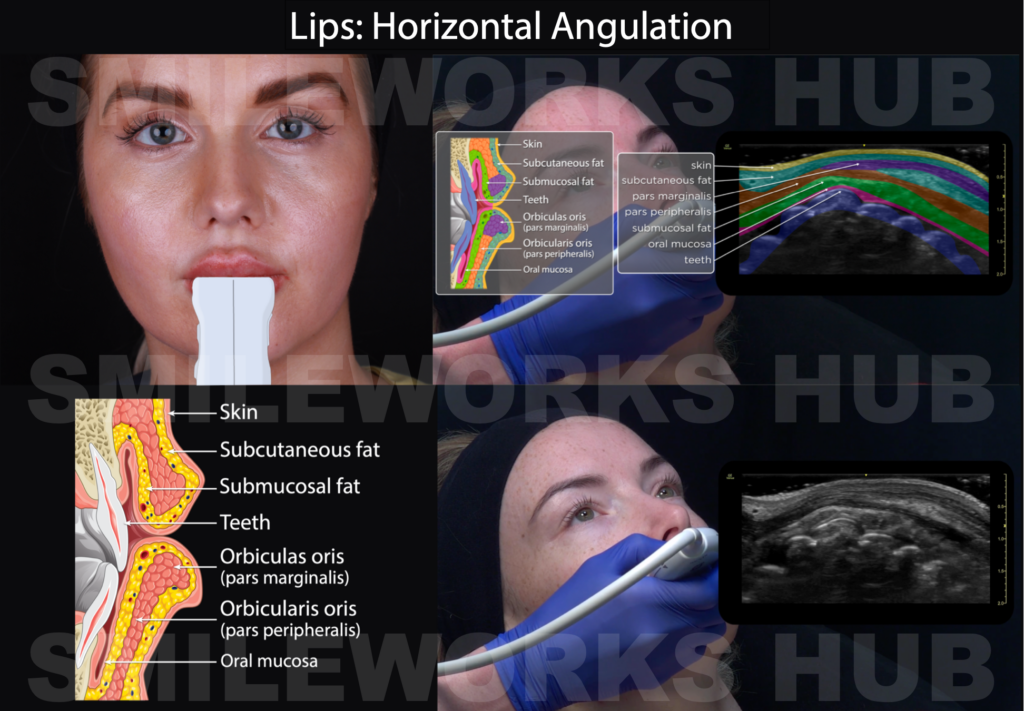
When injecting the lips, it’s important to achieve just the right depth with your needle or cannula. Traditionally, we want to aim for our injection depth to be in the deep dermal or immediate subdermal plane, at the junction of the dermis and the hypodermis. This means the needle depth is quite superficial.
Let’s make this even simpler.
Think of it like bedding. There are three different injection depths just like there are three different bedding coverings.
The first is the sheet. This is the most superficial layer of the skin where you can clearly see the contour and colour of the needle below. There is a very thin covering of skin over the needle.
The second is the blanket. Here you can just make out the contour of the needle, but not the colour. This is the most ideal depth for lip fillers as it ensures the filler is placed in the subdermal plane, just at the right junction between the dermis and the hypodermis. It’s deep enough to avoid filler visibility and shallow enough to avoid deeper structures like blood vessels.
The third is the duvet. At this depth, the needle is concealed under a significant layer of tissue. For lip fillers, this injection depth is considered unsuitable as it risks placing filler too close to underlying structures.
Injecting at the “blanket” level requires not just an understanding of lip anatomy, but also skill in the technique. It’s a balancing act – too superficial, and the filler may be visible or migrate; too deep, and there’s risk of vascular complications.
As you gain more experience with lip fillers, distinguishing between depths becomes second nature, but until then, the bedding analogy is a helpful guide for beginner injectors.
The Best Lip Filler Technique: Linear Threading
Our preferred lip filler injection technique is linear threading. This method involves using a small cannula or needle to inject filler parallel to the vermillion border of the lips. The end result is enhanced lip definition and increased volume.
It’s the perfect technique for beginners as it is safe and produces predictable results for your patients. This method is also referred to as the classic lip filler technique.
Step-by-Step Guide to Linear Threading
1. Hand Positioning
Use a bimanual technique for stability control. Your non-dominant hand should gently stabilise the patient’s lip and head, giving you a taut but comfortable working area. This hand also allows you to feel the injection depth and progress the filler placement.
2. Entry Point
Carefully insert the needle at the starting point of the linear thread. The entire length of the needle should be introduced into the superficial tissues, ensuring it’s at the correct “blanket” depth.
3. Check the Depth
Before injecting, slightly lift the needle and use your index finger to assess the covering of tissue over the needle.
4. Inject the Filler
With the needle in the correct position, apply firm and controlled pressure to the syringe plunger. As you see the plunger advance slightly, begin to slowly retract the needle, continuing to apply pressure. This technique allows the filler to be deposited in a retrograde fashion, laying down a smooth linear thread of filler as you move.
5. Maintain Tissue Support
It’s vital to keep supporting the tissue with your non-injecting hand, feeling the needle and filler as it’s being deposited. This helps you ensure the filler is distributed evenly. Always keep your focus on the tissue and the aesthetic effects of the filler rather than the syringe.
5. Finishing Touches
Once finished injecting, assess the lips for symmetry, volume, and smoothness. It’s not uncommon to make minor adjustments to perfect the result.
See the video below for a video demonstration of using the linear threading technique.
Alternative Injection Techniques
There are many other lip techniques beyond linear threading, and each have their own set of advantages and outcomes. These techniques typically require more skill and experience than the traditional linear threading technique.
Lip Tenting Technique
With the tenting technique, a series of injections are placed into the body of the lip instead of the vermillion border. This method involved creating nearly vertical injections from multiple points, creating a tent-like structure.
Russian Lip Technique
This trendy technique is inspired by the heart-shaped lips of Russian dolls. The aim of the Russian lip method is to add volume to the centre of the lips to lift them upwards instead of outwards. A Cupid’s bow and a full centre are integral to this technique. However, be wary of this method as it often creates an overfilled look many patients don’t want.
Microdroplet Technique
The microdroplet technique involves injecting very small amounts of filler at multiple points along the lips. It offers a subtle enhancement and is ideal for smoothing out fine lines around the lips.
Fan Technique
This technique involves injecting in a fan-shaped pattern from a single entry point in the lip. This helps spread the filler evenly across the lip area, providing a balanced enhancement.
Other Considerations
Avoiding Complications
As an aesthetic practitioner, safety should be your first priority. While lip filler procedures are generally considered safe, complications are still possible. These risks can be mitigated with proper training and technique.
When injecting the lip, remember to never go deeper than 3mm. This is because of the risk of damage to the vasculature in the upper and lower lip and the superior and inferior labial arteries. If you inject at “blanket” depth, you should never find yourself this deep.
Using the linear threading technique when you’re first starting out can also help you avoid complications since it’s a relatively straight-forward method. Once you become more advanced, it will become easier to distinguish between different injection depths, and you’ll have the ability and skill set to use other techniques.
But remember: just because a new, trendy technique comes onto the scene does not make it safe.
Another way to avoid complications and ensure patient safety is to make sure your non-injecting hand supports and gently squeezes the tissue. We do this to reduce the risk of a vascular occlusion.
As you progress your skills, you’ll eventually be able to also compress the superior labial artery at the oral commissure for maximum safety. However, this is an advanced technique. For now, just focus on tissue support between your fingers.
See our blog post on lip fillers gone wrong for more information on lip filler complications.
Tools & Fillers Used
We recommend beginner injectors start with a needle as cannulas are more difficult to work with. But don’t worry; you can still produce beautiful results with a needle. Many injectors never move on to cannula injecting, and this is completely normal.
As for the type of filler, a soft hyaluronic acid dermal filler is always used for lips. There are different filler brands that vary in aqueous solubility, thickness, and water-drawing ability. It’s up to personal preference which filler you use. We dive into all of this and more in our online course.

Learn From The Best In The Industry!
Meet the Smileworks Aesthetic Training HUB – an esteemed aesthetic training centre based in the UK. We pride ourselves on our wide range of online and hands-on courses tailored for every skill level. Whether you’re taking your first steps into the world of Botox and fillers, or you’re an advanced injector aiming to master facial ultrasound techniques, we have the expertise and courses to suit your needs.
Stop pursuing a thankless career that doesn’t make you happy.
Don’t let financial limitations keep holding you back from living your fullest life.
It’s time to embrace the prospering world of aesthetic medicine. The HUB provides you with all the right training and guidance you need to succeed. Take control of your professional journey and step into a future filled with endless potential and opportunities.
Join us at the HUB. Let’s shape the future of aesthetic medicine together and ensure safe, effective, and transformative results for every patient.
Want to try out our courses before committing? Take advantage of our free trial for a taste of what learning at the HUB is like.
